Chemistry for clean environment
(chemical ways to reduce the waste)
Step 1 - Activities
Making your own compost
Main activities
Activity 1: Make your own compost using suitable for composting organic waste;
Activity 2: Test if the compost is ready for use;
Activity 3: Use the finished compost in the garden
Activity 1
To make your own compost at home you have to follow these few basic steps:
- Choose a site for the compost pile;
- Choose a type of composting;
- Add the ingredients;
- Care for and feed the compost pile;
- Monitor the composting process.
Step 1: Choose a site
It is important to compost discretely away from your house, but not so far away that you may not want to go out and attend to it. There are some other factors to consider:
- Downwind from your house - Even a well-managed compost may occasionally emit unpleasant odors;
- Wind - too much wind can dry or scatter the material;
- Sunlight - Sunlight can help warm the compost in the winter, but too much sunlight can dry it out; the most suitable place is under a large shadow tree, providing with shade in the summer and sunlight in the winter;
- Drainage – a good drainage is necessary so that water will not accumulate by the compost;
- Surface - Bare earth is better than concrete.
Step 2: Choose a type of composting
The type of the composting can be:
- passive composting - compost structure is like a heap where you just pile all of the ingredients and let natural processes to degrade the organic waste; passive composting is less efficient and slower than
- active composting - you manage the composting process on a daily basis.
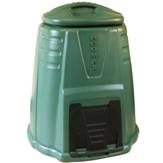
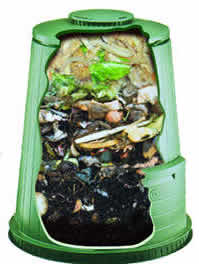
Fig.1 Plastic Composting bin
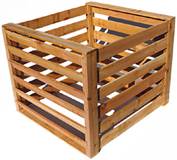
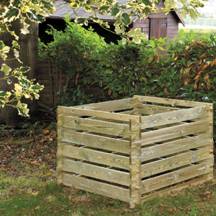
Fig.2. Wooden composting bin
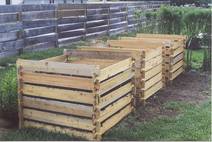
Fig.3. Three-bin composting system
The suitable technique for passive composting is the pile composing. For home composting the preferred technique is composting in compost bins. They can be simple plastic (fig.1) or wooden (fig.2) single bins, in which you add new materials to the top, turn the compost frequently and collect the finished compost from the bottom. They can also be multi-compartment (three-bin) structures (fig.3) in which you add new material to one bin, transfer partially-completed compost to the middle bin and move finished compost to the final bin. There should be some covering on the top of the bin to minimize excess rainwater and reduce scattering from the wind.
The choice of composting type and bin depends on:
- the effort and expense that you wish to devote to the process;
- the amount of compost that you wish to make.
The most often used are various constructions of plastic bins.
Step3: Add the ingredients
The following materials could be composted easily:
- Kitchen waste - best to chop up or grind the wastes so that they can be broken down faster
- Fruit and vegetable wastes - peels, skins, seeds, leaves
- Egg shells
- Coffee grounds (including paper filters), tea bags, used paper napkins
- Corncobs - should be shredded to make them break down quickly
- Meat/dairy products - see sidebar
- Yard waste
- Grass clippings (a source of nitrogen)
- Leaves
- Pine needles
- Weeds
- Woody materials (branches, twigs)
- Straw or hay
- Newspaper
- Sawdust ( a source of carbon).
The following materials should not be composted:
- Human waste or pet litter - They carry diseases and parasites, as well as cause an unpleasant odor;
- Diseased garden plants - They can infect the compost pile and influence the finished product;
- Charcoal ashes - They are toxic to the soil microorganisms.
- Pesticide-treated plant material - These are harmful to the compost foodweb organisms, and pesticides may survive into the finished compost.
Place kitchen or yard wastes into the composting bin. Chop or shred the materials if you want them to compost quickly. It is best to arrange carbon-rich (brown) and nitrogen-rich (green) materials in alternating layers. Cover the composting materials with plenty of soil in the compost bin - this layer contains the microorganisms and soil animals that do the work of making the compost. It also helps keep the surface from drying out.
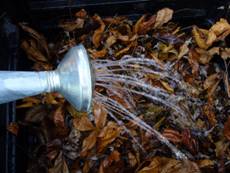
Fig.4. Compost watering
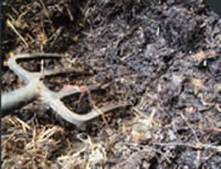
Fig.5. Compost mixing
Adjust the moisture in the compost bin - add dry materials (straw or sawdust) if it is too moist, or add water if it is too dry (fig.4) The simple test could be done to decide if the moisture is enough: when you squeeze the material in your hand it should be damp to the touch, but not so wet that drops come out.
Mix or turn the compost pile to provide plenty of air (Fig.5).
Step 4: Care and feed the compost pile
Add new layers of composting material to the top along with fresh soil (Fig.6). Water the compost bin regularly to keep the compost moist. Turn the compost at least once per week to ensure an adequate supply of oxygen. You can avoid turning the compost by inserting perforated PVC pipes into the bins to introduce a regular air supply (fig.7).
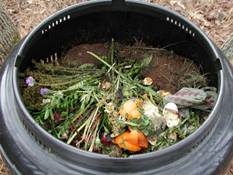
Fig.6. Add new layers of waste and soil in the bin
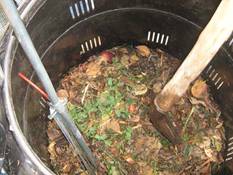
Fig.7. Turn the compost at least once per week to supply the necessary amount of oxygen
As you add new layers and turn the compost, the new layers will be mixing with partially decomposed layers. The partially and nearly finished material will settle to the bottom because the particles are smaller. The finished compost will come out the bottom of the bin.
Step 5: Monitor the composting process in your bin and adjust it if necessary
Here are some signs that your compost process “works” properly:
- The compost does not smell bad - it should have a sweet, earthy smell;
- It is warm - the microorganisms are working and you may even see some steam rising from the compost when it is cold;
- You may see some gas bubbles in the pile, because carbon dioxide is being released during the biodegradation.
If the compost shows some “unusual” behavior during the biodegradation process here are some practical solutions depending on the problem arrised:
| Problem |
Possible reason |
Solution |
| Compost is wet and has a bad odor |
Not enough air
Or too much nitrogen
Or too wet |
Turn compost
Mix in with dry materials (straw, sawdust, wood chips)
Turn pile and add straw, sawdust, or wood chips; provide drainage |
| Compost does not heat up |
Lack of composting material;
pile is too small
Or is too dry |
Add more materials;
Make pile larger
Add water while turning the compost |
| Compost is damp and sweet smelling but will not heat up |
Not enough nitrogen |
Add grass clippings, food scraps, or other sources of nitrogen |
| Compost is attracting animals |
Meat and other animal products have been included
Or food scraps are not well covered |
Keep meat and other animal products out of the pile;
Cover all food with brown materials such as leaves, wood chips, or finished compost |
Activity 2:
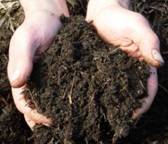
Depending on the type and conditions of composting process it could take 3 – 12 months to obtain the final product – mature compost. The finished compost will be collect at the bottom of the bin ore pile.
Here are some parameters that you can use to judge if the compost is ready:
- Temperature - If you measure the temperature it should be below 35°C;
- Appearance - the material should be at least 50 % decomposed;
- Size - the volume of the compost should be reduced by 50 to 75%;
- Color – the color of the compost should be dark brown or black;
- Texture – the compost should be crumbly;
- Smell - it should smell like excellent soil.
Activity 3:
Once your home made compost is ready, it could be used in the garden or yard. Finished composts can improve the soil structure, increase the activity of soil microbes, enhance the nutrient substance of the soil, improve the soil chemistry (particularly the degree of acidity pH) etc.
Composting is a cheap and easy way to create your own totally natural fertilizer “using” household and garden waste. Instead of throwing out you can put it to good use - this way you can save money not having to pay for fertilizer and will reduce the amount of landfill waste.